How to Hem a Dress for Proms and Special Events

How to Hem a Dress for Proms and Special Events
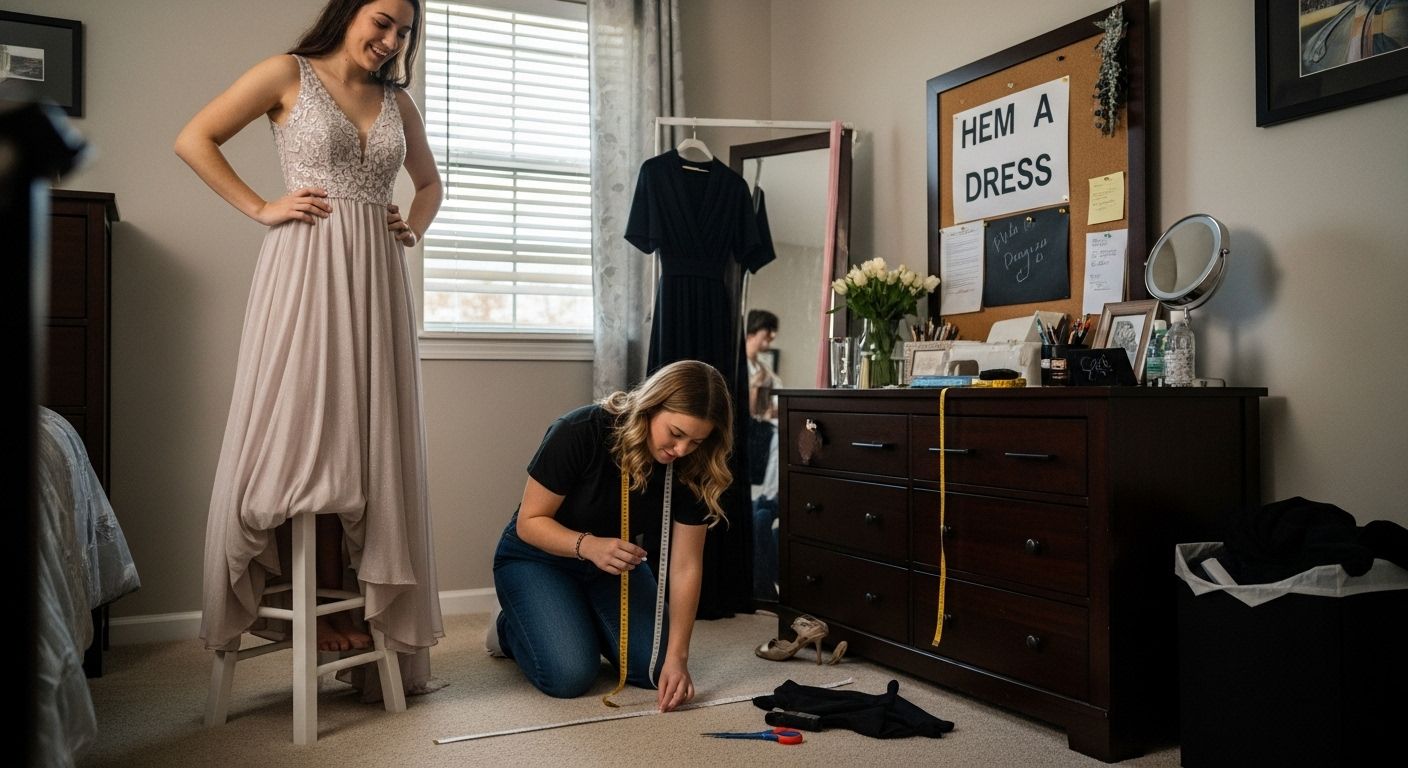
Prom season has everyone searching for the perfect look and that can mean last-minute dress adjustments. Nearly 70 percent of people try hemming their own formal wear at home, hoping for a custom fit with zero sewing experience. Surprising, right? The real shock is that you do not even need a sewing machine or a needle if you are in a rush. There are clever no-sew fixes and pro tricks that can rescue your dress minutes before the big event.
Table of Contents
- Essential Tools And Materials For Hemming
- Choosing The Perfect Hem Length For Your Event
- Step-By-Step Guide To Hemming A Dress
- Quick No-Sew Hemming Methods For Last-Minute Fixes
Quick Summary
| Takeaway | Explanation |
|---|---|
| Use quality tools for accurate hemming. | Invest in fabric scissors, measuring tape, and marking tools to ensure precise hem measurements and cutting. |
| Select appropriate hem length for your body type. | Consider your height and silhouette when choosing hem lengths to enhance your natural proportions and achieve a flattering look. |
| Follow step-by-step hemming techniques. | Prepare your dress carefully, choose the right method for the fabric, and press the hem for a polished finish. |
| Implement quick no-sew solutions for emergencies. | Use fusible webbing or double-stick tape for temporary hems when time is short, but remember these are not permanent fixes. |
| Create an emergency hemming kit. | Include items like fashion tape, fabric scissors, and adhesive in your kit to quickly address last-minute dressing issues. |
Essential Tools and Materials for Hemming
Hemming a dress requires precision and the right set of tools to achieve a professional-looking finish. Whether you’re preparing for a prom, wedding, or special event, having the correct materials can make the difference between an amateur alteration and a perfectly tailored garment.
Fundamental Sewing Tools for Accurate Hemming
Accurate hemming starts with selecting the right tools. SewGreen, a community-based sewing education organization, recommends a comprehensive toolkit for successful dress alterations. Your essential collection should include high-quality fabric scissors specifically designed for clean cutting without fraying fabric edges. Regular household scissors can damage delicate dress materials, so investing in professional-grade fabric shears is crucial.
A measuring tape or ruler becomes your best friend when learning how to hem a dress. Precision is key in creating an even hemline that falls perfectly at the desired length. Look for a flexible measuring tape with clear markings that allows you to measure curved surfaces and adjust measurements accurately. Marking tools like tailor’s chalk or fabric pencils help you create temporary guide lines without permanently marking your dress fabric.
Sewing Supplies for Professional Hemming Results
Pins and needles are fundamental to creating a smooth hem. Select fine, sharp pins that won’t leave visible holes in delicate fabrics. For most special occasion dresses, you’ll want both hand sewing needles and machine needles appropriate to the fabric weight. Lightweight chiffon requires different needles compared to heavier satin or velvet materials.
Thread selection matters significantly in hemming. Choose thread that closely matches your dress color to create an invisible finish. For sheer or lightweight fabrics, opt for fine, thin thread that blends seamlessly. Thicker threads work better for structured fabrics like wool or heavy cotton. Professional tailors recommend matching thread color as closely as possible to ensure your hemming remains undetectable.
Essential Pressing Equipment
An iron and ironing board are critical for creating crisp, professional hems. Steam and heat help set fold lines and create sharp edges that make your hemming look precise. Use a pressing cloth between the iron and delicate fabrics to prevent potential scorching or shine. Adjustable temperature settings allow you to work safely with different fabric types, from delicate silk to sturdy cotton blends.
Additional helpful tools include fabric weights to hold material steady while measuring, seam gauges for consistent folding, and fabric stabilizers for slippery or stretchy materials. Having these tools prepared before starting your hemming project ensures a smoother, more professional alteration process.
Below is a checklist table summarizing the essential tools and materials recommended for hemming a dress, helping you ensure you have everything you need before starting the process.
| Tool/Material | Purpose | Included in Hemming Kit? |
|---|---|---|
| Fabric Scissors | Clean cutting without fraying fabric edges | Yes |
| Measuring Tape | Precise hem measurements on curves | Yes |
| Marking Tools | Temporary guide lines (chalk/pencil) | Yes |
| Pins/Needles | Smooth, secure hold; sewing hem | Yes |
| Matching Thread | Invisible finish matching dress color | Yes |
| Iron/Ironing Board | Pressing for crisp, professional hem | Yes |
| Pressing Cloth | Prevents scorching on delicate fabrics | Optional |
| Fabric Weights | Hold fabric steady while measuring | Optional |
| Seam Gauge | Consistency in folding fabric | Optional |
| Adhesive/Fashion Tape | Emergency no-sew hemming | Yes (for emergencies) |
Remember that practice makes perfect. Even with all the right tools, hemming takes skill and patience. Start with scrap fabric to build confidence and understand how different materials behave during the hemming process.
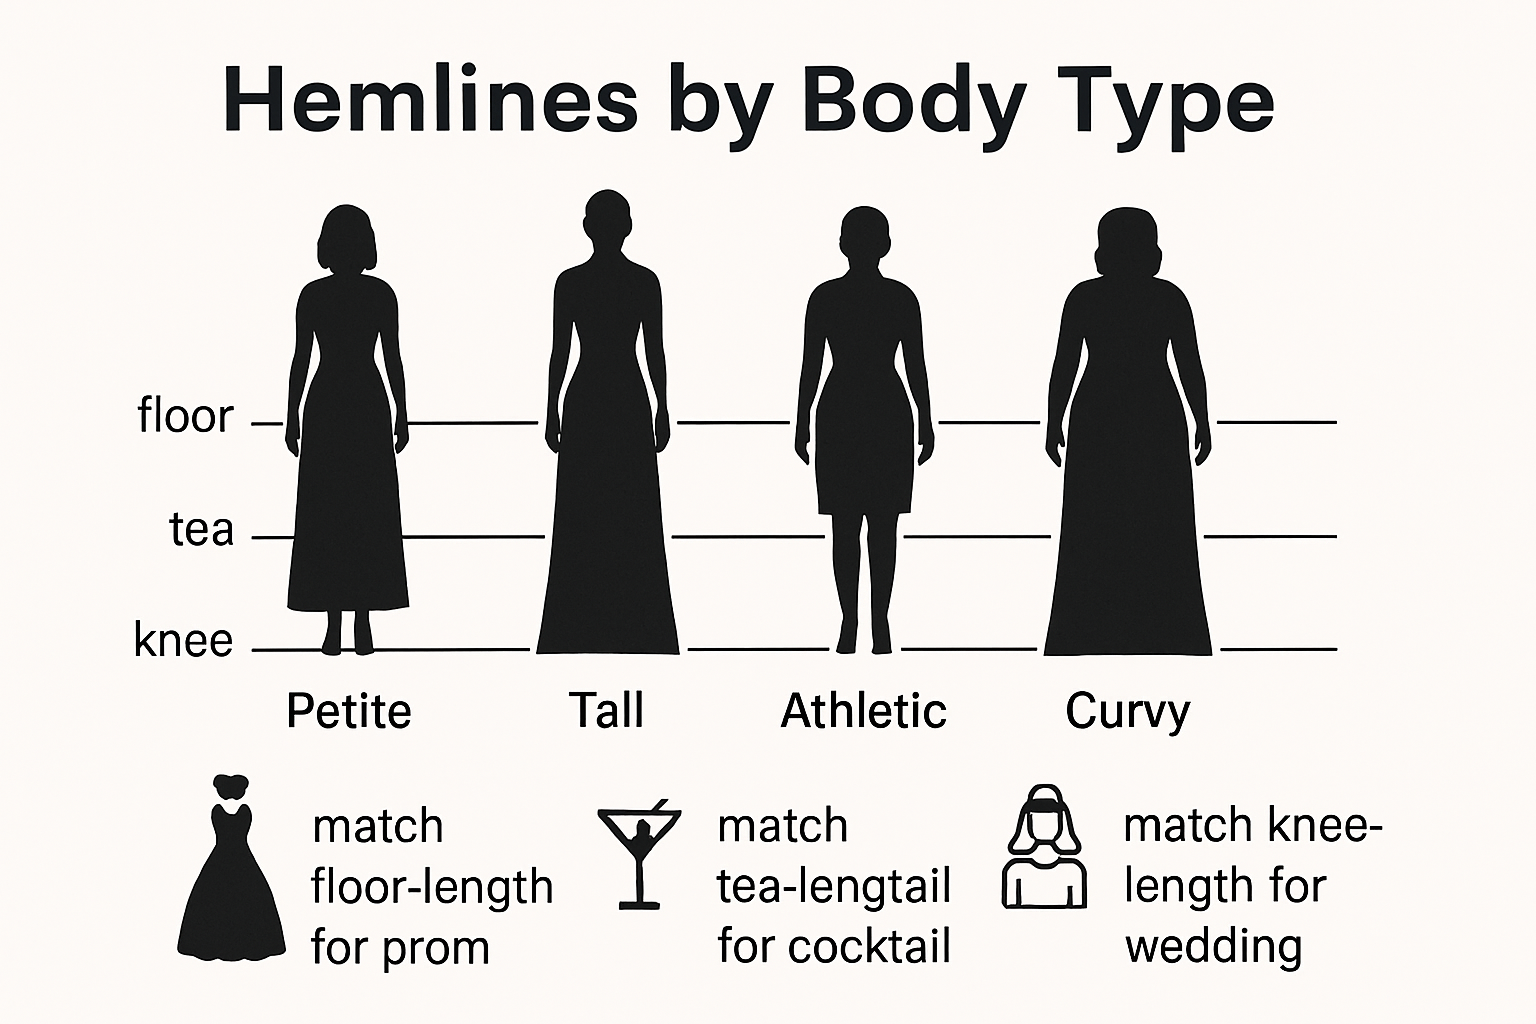
Choosing the Perfect Hem Length for Your Event
Selecting the ideal hem length is more than a technical skill it’s an art form that can dramatically transform your dress’s overall appearance and your confidence at any special event. Understanding how different hem lengths complement various body types and event styles will help you make the most flattering choice.
Understanding Hem Length Basics
Hem length plays a crucial role in defining your silhouette and creating the right aesthetic for your occasion. The Fashion Institute of Technology notes that hem placement can visually elongate or shorten your body, making strategic selection essential. For prom and formal events, the most common hem lengths range from just above the knee to floor-length, each offering unique advantages.
Floor-length hems create an elegant, dramatic look perfect for black-tie events and formal occasions. These hems should just barely skim the floor, allowing a slight reveal of your shoes without dragging. Cocktail dresses have length that typically fall between the knee and mid-calf, offering versatility for semi-formal events. Tea-length hems hit mid-calf and provide a vintage-inspired, sophisticated appearance that works beautifully for wedding receptions and daytime formal events.
Matching Hem Length to Body Proportions
Your body type significantly influences which hem length will be most flattering. Style experts recommend specific guidelines for different silhouettes. For petite frames, avoiding overly long hems that overwhelm your height is crucial. Knee-length or slightly above-the-knee hems can create the illusion of longer legs and a more balanced proportion.
Taller individuals have more flexibility with hem lengths. Floor-length ball gowns can showcase height beautifully, while midi lengths can create interesting visual breaks. Those with athletic or rectangular body shapes might benefit from hems that create the appearance of curves, such as those with slight flares or asymmetrical designs.
Event-Specific Hem Considerations
Each event has its own unwritten dress code that influences appropriate hem lengths. Prom typically allows more dramatic and bold choices, where floor-length gowns or high-low designs can make a statement. Wedding guest attire requires more nuanced selection avoid outshining the bride while maintaining elegance. Cocktail events permit more playful knee-length or tea-length options that balance sophistication with personality.
Consider the venue and time of day when selecting your hem. Outdoor evening events might require slightly longer hems to prevent tripping, while daytime indoor celebrations can accommodate shorter, more dynamic lengths. Always factor in your comfort and ability to move easily dance, and navigate the event space.
Remember that hem length is not just a measurement it’s a personal style statement. Trust your instincts, feel confident in your choice, and select a length that makes you feel beautiful and comfortable. The perfect hem length should not just fit your dress but enhance your unique personality and the spirit of the special occasion you’re attending.
Step-by-Step Guide to Hemming a Dress
Hemming a dress requires patience, precision, and a systematic approach. Whether you’re preparing for a special event or adjusting a beloved garment, mastering the hemming technique can transform your dress and elevate its overall appearance.
Preparing Your Dress for Hemming
New Mexico State University’s guide on Making Perfect Garment Hems emphasizes the importance of thorough preparation. Begin by trying on the dress with the shoes you’ll wear at the event. Stand on a flat surface and have someone help you mark the desired length using straight pins or tailor’s chalk. Create a level line around the entire circumference of the dress, ensuring the hemline is even from all angles.
Before cutting, carefully remove any existing hem stitching. Press the fabric with an iron to create a smooth surface, removing any previous fold lines or creases. If your dress has a lining, you’ll need to hem it separately, typically slightly shorter than the outer fabric to prevent visible bunching.
Hemming Techniques for Different Fabrics
The Project Gutenberg eBook highlights various hemming techniques suitable for different fabric types. For delicate fabrics like chiffon or silk, a blind hem is often the best approach. This technique creates an almost invisible finish by taking tiny, barely noticeable stitches that catch only a thread or two of the fabric.
To help you quickly identify which hemming method is suitable for different fabric types, here is a comparison table based on techniques discussed in the article.
| Fabric Type | Recommended Hemming Method | Description / Benefit |
|---|---|---|
| Chiffon/Silk (Delicate) | Blind Hem | Nearly invisible, tiny stitches for a subtle finish |
| Stretchy Knits | Zig-Zag Hem or Serge | Flexible and prevents breakage when fabric stretches |
| Wool/Heavy Cotton | Turned Hem | Offers crisp, structured, and clean finish |
| Structured Fabrics | Fusible Webbing (No-Sew) | Temporary, clean finish without need for sewing |
| Delicate Fabrics | Double-Stick Fashion Tape (No-Sew) | Invisible, quick, temporary solution during emergencies |
| Jersey Dresses | Zig-Zag Trim | Quick, cut-to-line no-sew adjustment for flexible materials |
| Silk/High-End Materials | Fabric Adhesive Spray (No-Sew) | Temporary, non-damaging hem for delicate, luxury fabrics |
New Mexico State University’s Sewing Shortcuts recommends a zig-zag or serge hem for stretchy fabrics like knits. This method provides flexibility and prevents the hem from breaking when the fabric stretches. For structured fabrics like wool or heavy cotton, a traditional turned hem works best, offering a crisp, clean finish.
Executing the Perfect Hem
Start by trimming the excess fabric, leaving about an inch of allowance for hemming. Fold the fabric to the marked line, pressing with an iron to create a sharp, even fold. For a blind hem, fold the fabric so a small portion of the folded edge is visible. Use pins to hold the fold in place, removing them as you sew.
When machine sewing, use a thread that matches the dress color exactly. Select the appropriate needle for your fabric type thin needles for delicate fabrics, stronger needles for heavier materials. Sew slowly and carefully, keeping the stitches as close to the folded edge as possible. For hand sewing, use small, even stitches that barely catch the fabric surface.
After completing the hem, press it again with an iron to set the stitches and create a professional finish. Try on the dress to ensure the length is perfect and the hem sits smoothly. Make any necessary adjustments before wearing it to your special event.
Remember that hemming is a skill that improves with practice. Don’t get discouraged if your first attempt isn’t perfect. Each dress and fabric presents unique challenges, and developing your hemming technique takes time and patience. With careful attention to detail and practice, you’ll soon be creating professional-looking hems that enhance the beauty of your special occasion dress.
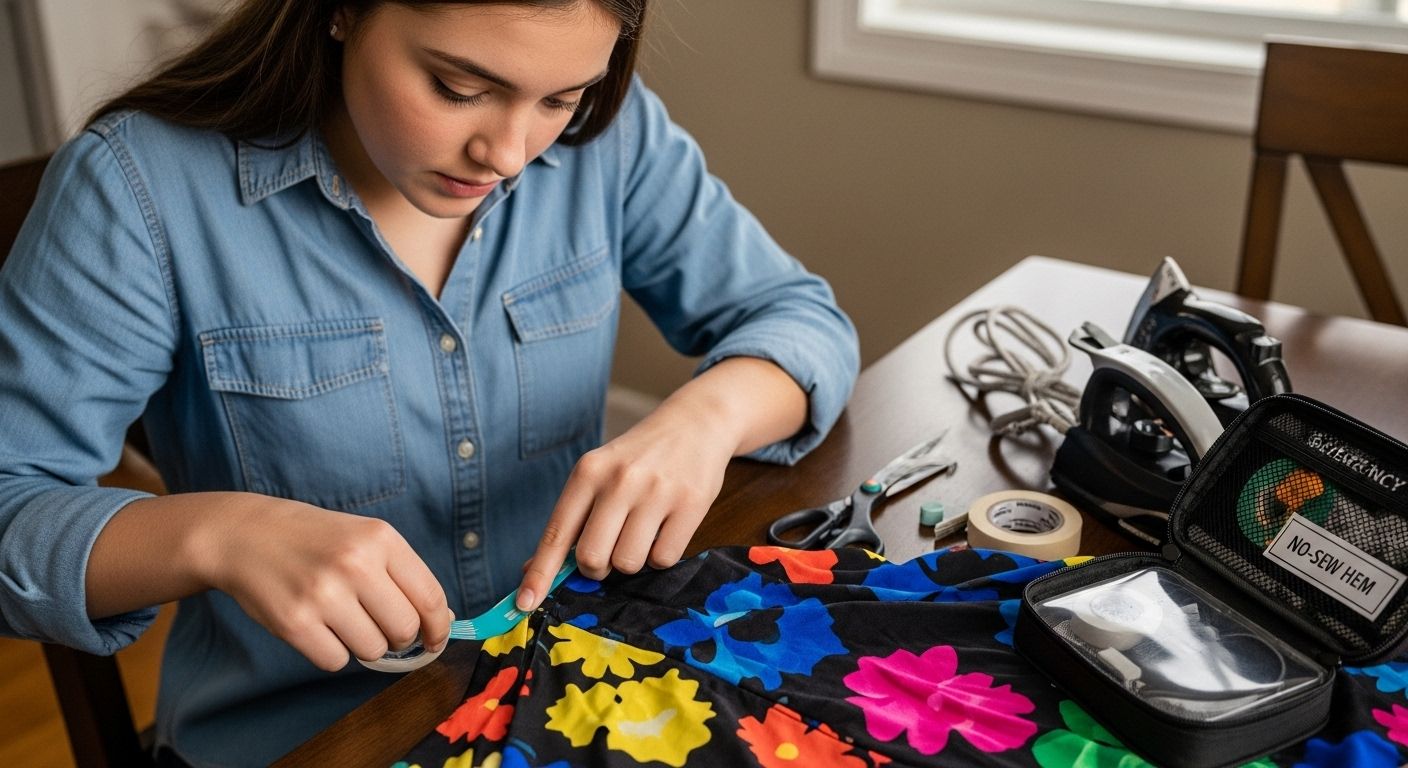
Quick No-Sew Hemming Methods for Last-Minute Fixes
Sometimes events sneak up quickly, and you might find yourself with a dress that needs hemming but no time for traditional sewing techniques. Emergency hemming solutions can save your outfit and your confidence when you’re racing against the clock.
Temporary Adhesive Hemming Techniques
The Portland, Oregon chapter of the American Sewing Guild recommends fusible webbing as a quick hemming solution. This heat-activated adhesive creates a temporary hem that looks professional and holds securely. To use fusible webbing, cut the material to match your desired hem length, place it between the fabric layers, and use a warm iron to activate the adhesive. This method works best for structured fabrics and provides a clean, crisp finish without threading a needle.
For those truly pressed for time, AARP suggests using double-stick fashion tape or duct tape as an emergency hemming solution. While not a permanent fix, these quick methods can rescue a dress moments before an event. Fashion tape works particularly well for delicate fabrics, creating an invisible temporary hem that stays in place during your event.
No-Sew Methods for Different Fabric Types
New Mexico State University’s fabric alteration guide offers specialized no-sew techniques for various fabric types. For stretchable knits, they recommend using a zig-zag trim method where you carefully cut the excess fabric close to a pre-measured line. This technique works well for jersey dresses and other flexible materials that might be challenging to hem traditionally.
For silk and delicate fabrics, fabric adhesive sprays can create a temporary hem with minimal risk of damage. These specialized adhesives are designed to be removable and won’t leave permanent marks on high-end materials. Apply the spray carefully, following the manufacturer’s instructions, and use a pressing cloth to set the hem without direct iron contact.
Emergency Hemming Survival Kit
Prepare a small emergency hemming kit to handle last-minute dress alterations. Include items like fashion tape, fabric scissors, fusible webbing, a small travel iron or hair straightener, and fabric clips. These tools can help you quickly adjust a hem without a full sewing setup. Lightweight fabric adhesives and special hemming tapes can be lifesavers when you’re short on time.
Remember that while these no-sew methods provide excellent temporary solutions, they are not permanent fixes. For long-term dress care, professional hemming or traditional sewing techniques remain the best option. These quick fixes are designed to get you through a specific event with confidence and style.
Always test any adhesive or no-sew method on a small, inconspicuous area of the dress first. Some fabrics react differently to temporary hemming techniques, and you want to avoid potential damage or discoloration. With a bit of creativity and the right tools, you can achieve a professional-looking hem even when time is not on your side.
Frequently Asked Questions
What tools do I need to hem a dress for a prom or special event?
To hem a dress accurately, you need fabric scissors, measuring tape, marking tools (like tailor’s chalk), pins, matching thread, an iron, and an ironing board. Optional tools include fabric weights, seam gauges, and adhesive tape for emergencies.
How do I determine the right hem length for my dress?
To determine the right hem length, try on the dress with the shoes you’ll wear and mark the desired length with straight pins or tailor’s chalk. Ensure the hemline is even around the entire dress for a polished look.
What are the best hemming techniques for different fabric types?
For delicate fabrics like silk or chiffon, use a blind hem for a nearly invisible finish. For stretchy fabrics, a zig-zag hem is preferred, while structured fabrics like wool benefit from a turned hem. Adhesive options are great for quick fixes.
How can I fix a dress hem in an emergency without sewing?
In emergencies, use fusible webbing or double-stick fashion tape to create a quick hem. Both methods adhere fabric layers temporarily and are especially effective for delicate and structured materials.
Find the Perfect Fit and Style at Dress Me Up NY
Are you tired of last-minute, stressful dress alterations before proms or special events? If hemming your own dress, struggling with fabric scissors and fusible tape, has left you feeling overwhelmed, you are not alone. Many people aim for that polished, custom look but discover that true confidence comes from wearing a dress that fits perfectly from the start. You deserve a gown that flatters your body, feels comfortable, and needs zero emergency fixes.

Elevate your special occasion experience by browsing the remarkable collection at Dress Me Up NY. Explore a wide range of prom dresses and evening gowns designed with precision and available in multiple lengths, so you can shine without the hassle of last-minute hemming. Shop now to take advantage of exclusive offers and discover effortless style that lets you focus on making memories, not managing dress emergencies.
Recommended
- Terani Couture 2021E2824 Asymmetric Neck One-Shoulder Dress
- Terani Couture 251P4002 Embroidered Tulle Strapless Dress
- Clarisse 810297 Stunning Seqiun Deep V-neck Ball Gown
- Terani Couture 2011C2020 One-shoulder Slit Knee Length Dress